Pages

Showing posts with label Recipes - Main Dishes. Show all posts

Sunday, November 8, 2009

Recipe of the Week: Stuffed Chicken Pillows

I've seen several variations of this recipe. Using a combination of ideas, I came up with my own version earlier this week. HOLY. COW. These are good! Last night I made them again for some friends we had over, and they were just as delicious as we remembered them! It seemed no one could get enough. Try them out! They are so simple and yummy. Also a great way to use up left over Thanksgiving turkey!

Stuffed Chicken Pillows

Ingredients:
  • 1 8oz. tube crescent rolls (8 ct.)
  • 2/3 c. Stovetop stuffing, coarsely crushed
  • 6 T. butter, melted

Filling ingredients:

  • 2 cups chicken, cooked and shredded/cubed (I seasoned with garlic salt and sage)
  • 1 8oz. package cream cheese
  • 4 T. butter, softened
  • 1 T. fresh parsley, coarsely chopped
  • 1/2 c. colby jack cheese
  • salt and pepper to taste
Instructions:

Combine filling ingredients and blend with hand mixer in large bowl.

In a pie dish or shallow bowl, combine melted butter and stuffing; mix until butter is absorbed.

Remove crescent rolls from tube and lay them out flat. Divide filling among crescent rolls, placing a dollop on the wide end, then roll them up, squeezing sides together as needed to ensure none of the filling escapes. :) Coat crescent rolls liberally with stuffing mixture and place on ungreased cookie sheet. Bake at 350 for 15-20 minutes until lightly brown.

While I haven't tried it, I read you can freeze these babies. I want to say you bake them at 275 for 10 minutes, cool and throw into freezer bags and freezer. Then when you're ready to eat them, just throw them onto an ungreased cookie sheet and bake at 350 for 15-20 minutes. Again, haven't tried it, but it seems like it would work just fine.

Misc.:

Some versions of this recipe call for bread crumbs rather than stuffing. Some don't call for ANY coating, but rather a cream of chicken gravy that you can pour over the top (can of cream of chicken soup diluted with milk). While my recipe above is the only way I've tried these, I'll have to say there's nothing I would change! They are amazing as is, and practically effortless to make!

I think the concept of using crescent rolls this way also opens the door to endless filling possibilities! If you wanted to go Italian, you could combine chicken or ground beef, chopped spinich, spaghetti and/or pesto sauce, mozzarella cheese, and maybe a touch of cottage cheese. Or go Mexican with some taco meat, cheese, refried beans, salsa and sour cream. Gosh, you could even make these into a simple pastry dessert and fill them with fruit preserves and coat with sugar!
signautre

Wednesday, May 20, 2009

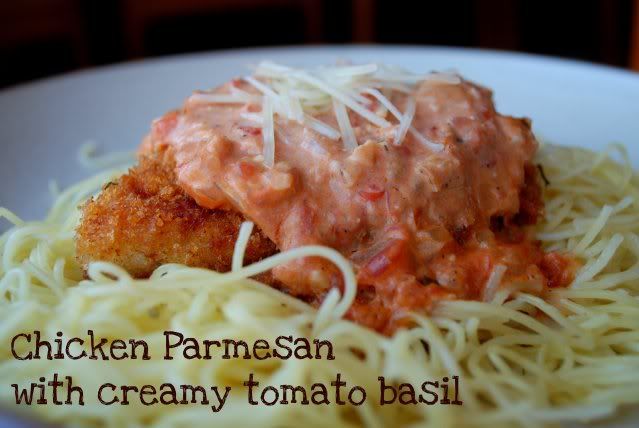
Recipe of the Week: Chicken Parmesan with creamy tomato basil

Here's a pasta dish I recently tried out. It was a hit, and I'll definitely make it again. I found this on My Fabulous Recipes, a food blog I stumbled upon a few weeks ago, and have since become slightly addicted to. The original recipe can be found here. Or here's my own adaptation.

Photobucket


Ingredients:
  • Your favorite pasta noodles (we love angel hair in this house)
  • 1 lb. chicken breasts, pounded 1/4 inch thick, then cut in half (I basically cut them to the size of large chicken tenders)
  • 1/2 c. flour
  • 3 large eggs
  • 2 c. panko (Asian bread crumbs)
  • 2 t. seasoned salt
  • 2 t. parsley flakes
  • 1/3 c. grated Parmesan cheese
  • Olive or canola oil
  • Creamy tomato basil sauce, below


Instructions:

You'll need 3 shallow bowls (I used pie dishes): 1 for the eggs (beaten), 1 for the flour, and 1 for the panko. Mix seasoned salt, parsley flakes, and parmesan cheese with panko.

Dredge chicken in flour. Shake off excess. Transfer to eggs, then onto panko mixture for an even coat. In a large skillet (I use my electric skillet), heat enough oil to create a very shallow layer on medium-high heat. When oil is hot, place the breaded chicken in the skillet and cook 2-3 minutes per side, or until golden brown. Transfer to a paper towel lined plate to drain excess oil.


Ingredients for Creamy tomato basil sauce:

  • 2 T. olive oil
  • 1 large red onion, chopped
  • 3 cloves garlic, finely chopped
  • 1/2 - 1 t. crushed red pepper flakes
  • 2 (14 ounce) cans diced tomatoes (I used 1 can and chopped them up a bit)
  • 1 T. balsamic vinegar
  • 1 T. dry red wine (optional - I didn't have any on hand)
  • 1 t. white sugar
  • 1/3 c. fresh chopped basil
  • 1/4 t. salt
  • 1/4 t. ground black pepper
  • 2/3 cup mascarpone cheese (here's a substitution: 16 oz. cream cheese, 1/3 c. sour cream, 1/4 c. heavy whipping cream - if I remember right, cutting this in half came to about 2/3 c.)


Instructions for sauce:

First, start your pasta, following package instructions.

In a medium sauce pan, heat olive oil over medium heat. Add onions, garlic, and red pepper flakes until carmelized, about 3 minutes, stirring occasionally. Stir in the tomatoes, balsamic vinegar, red wine (if desired), and sugar, and cook another 10 minutes, stirring occasionally. Stir in the basil, salt, and black pepper, and simmer, about 10 minutes. Remove from heat, and stir in the mascarpone cheese, until sauce becomes creamy. Pour over pasta and chicken and enjoy!


My own two cents:

The pasta absorbed the sauce pretty fast, so when I heated up leftovers, I added half and half to thin it out, and to make it go further. Next time I'll probably double the sauce recipe portion, and still add just a touch of half and half or whipping cream. Maybe I should have used the second can of tomatoes. That just seemed like a lot to me.

I wasn't sure about the panko, considering it's Asian and this is an Italian dish. But it was really good, and I'll absolutely use it again. I bought a box at Safeway for $1.79. It had a crunchier consistency than traditional bread crumbs and as a result, made getting a decent coat over the chicken much easier.

signautre

Wednesday, March 25, 2009

Recipe of the Week

Stir fry is a favorite of mine for a handful reasons. First of all, it's a simple one dish meal - always a plus. Second, it's healthy - at least it should be. And third, you can make up the ingredients as you go. Generally I grab whatever meat I have thawed and then rummage through the vegetable drawer of the fridge. There are always odds and ends needing to be eaten. My stir fry is simple, but very good. The key is not ingredients (though they help), but rather the temperature at which everything is cooked. Ever been to one of those teppanyaki restaurants where those crazy Japanese guys prepare your meal right in front of you? Not only is the experience mesmerizing (flying knives, flames, food being chopped at the speed of light, etc.), but the freshly cooked meal they then place in front of you tastes like it took much greater effort to prepare than it actually did. One thing I can guarantee is that they don't keep the heat on low or even medium when they're throwing (literally) together your meal. Oh no. That iron grill is HOT HOT HOT! And so is the pan I cook my stir fry in! Sure, you can guarantee a greasy cooking surface when all is said and done, but THAT is the key to a good stir fry. Here's my basic recipe.

Stir Fry

Ingredients:
  • 1-1 1/2 pounds meat: I either use chicken, steak (london broil is great but any cut will do) or pork, thinly sliced.
  • 4-5 cups vegetables: carrots, broccoli, onion, bell pepper, zucchini, mushrooms, cabbage, peas, asparagus, garlic, anything! Other possible additions include: bean sprouts, water chestnuts and those miniature corn on the cobs you can find near the pickles in the grocery store.
  • Oil: peanut, canola or olive - they all work great.
  • Rice: long grain or jasmine or a combination of the two.
  • Seasonings: I use garlic salt and soy sauce - that's all!

Instructions:
First, start your rice. I use long grain rice, which takes 25-30 minutes to cook. Last night I discovered I didn't have enough, so I ended up doing half long grain and half jasmine, which worked fine. Even though the directions say the rice takes about 20 minutes, I find the that longer it simmers in the pan, the fluffier and lighter it gets. So my rice often sits on LOW LOW heat for up to 40 minutes, and it turns out perfect. I can't stand it when my rice isn't entirely cooked through or hasn't absorbed all the water.

Chop and slice everything PRIOR to beginning the cooking process. Stir frying is fast, and you need to have everything ready to go before you turn the heat up. Here's how I prepare everything:

  • Meat - thin strips
  • Carrots, onions, and peppers - julienne strips
  • Zucchini - half moon slices
  • Cabbage, mushrooms, asparagus and broccoli - chopped
  • Garlic - minced
I add the peas last, straight out of the freezer bag. I never measure anything. I just use however much of each ingredient seems right (or whatever I need to finish off) until I have 4-5 cups.


Place a large frying or stir fry pan over medium/high heat. My stove has a heating range of 1-10. I usually have it between 6 and 7. After 3-4 minutes, add oil to the pan (almost enough to coat the bottom, but not quite). Wait another couple minutes for the oil to heat up, then throw the meat in. Chances are, you'll see immediate splattering, but this means you've got a good temp going. Brown the meat - and I mean really brown it! That's what gives it such great flavor. Generally I cook the meat no longer than 5 minutes, even if it isn't cooked all the way through. You don't want to dry it out, and it will eventually be making its way back to the pan, so don't worry. Sprinkle with salt and pepper or garlic salt, then transfer to a plate, reserving any meat juices in pan. At this point you may need to add a little more oil, just depending on how much the meat absorbed. Use your own judgement. While the pan it still hot, throw the veggies in. Saute for about 5 minutes. Then turn to low/medium (between 3 and 4) and cover. Let veggies simmer another 5-10 minutes, or until desired tenderness is reached. Add meat back to pan, mix well, cover and turn off heat, and let sit an additional 3-5 minutes. At this point it's probably more common to drizzle the stir fry with soy sauce (or any other sauce you want to use). Since Neil and I like different quantities, we wait until we've served ourselves to add it. Serve over rice, obviously.

Truly, this is such an easy and delicious dish to make! And amazingly enough, it needs very little seasoning. The soy sauce is obviously flavorful, but even just the combination of meat and veggies being cooked a high temperature creates a naturally great flavor. I think we have stir fry once a week and we never get tired of it. I much prefer steak over chicken or pork, but any meat makes this dish amazing! Hope you enjoy.
signautre

Tuesday, March 17, 2009

Recipe of the Week

When Neil's brother, Brad and his soon to be Mrs. Andersen, Courtney, were visiting over Thanksgiving, they cooked us this incredible chicken dish, which I finally tried out myself the other night. It was, once again, FABULOUS!

Orange Chip Chicken

Ingredients:
1 egg, beaten
1/3 c. milk
1/2 c. Italian style bread crumbs
1/3 c. crushed potato chips
1/3 c. olive or canola oil
4 boneless skinless chicken breast halves
1 large orange, cut into 6 slices
3 T. honey
1 T. butter

Instructions:
In shallow bowl or pie dish, combine egg and milk; mix thoroughly. In another shallow bowl or pie dish, combine bread crumbs and potato chips; mix well. Dip chicken into egg mixture, followed by bread crumb mixture until well coated.

Heat oil in 12-inch skillet over medium heat until hot. Add chicken and 4 orange slices. Cook until chicken is tender, turning occasionally and gently, squeezing orange slices several times to extract juice.

Remove orange slices from skillet. Add honey and butter to skillet; reduce heat to low. Turn chicken twice to coat. To serve, garnish with remaining orange slices.

My two cents:
I sliced the chicken into smaller pieces (like chicken tenders). This required more bread crumbs and potato chips, naturally. I used Lays Sour Cream and Onion chips, but even the plain Lays work great.

I left out the garnishing, instead adding the entire orange all at once. I also didn't measure the honey. Instead I drizzled as much as I wanted over the cooked chicken and then gently flipped the chicken to ensure an even coat. In addition to the honey and butter, I added a tiny bit of orange juice. The chicken absorbed it right up only to make it more tender, juicy and tangy.
signautre

Tuesday, January 13, 2009

Recipe of the Week

Wow, it's been a while since I shared a recipe. After receiving grief from a certain friend, I've decided to post a family favorite. It's nothing new. In fact I've been making it for over a year now, but it never gets old around here. I must give credit to Manya, who originally shared this with me.

An added bonus to this recipe is you actually get two separate meals out of it. The first night: rotisserie chicken; the second night: chicken noodle soup, or really anything else you could think of to do with tender yummy left over chicken!
Roast Sticky Chicken - Rotisserie Style

Ingredients:
  • 4 t. salt
  • 2 t. paprika
  • 1 t. onion powder
  • 1 t. thyme
  • 1 t. white pepper
  • 1/2 t. cayenne pepper
  • 1/2 t. black pepper
  • 1/2 t. garlic powder
  • 2 onions, quartered
  • 2 - 4lb. whole chickens
  • butter (optional)
  • 2 large oven bags

My own additions:

  • 4 medium potatoes, chopped into large chunks
  • 4 large carrots, sliced

Instructions:
In a small bowl combine spices. Remove and discard giblets from each chicken, rinse, and pat dry with paper towel. Rub each chicken inside and out with butter (if desired), followed by spice mixture. Place 1 onion into the cavity of each chicken. Place chickens in oven bags. Divide the potatoes and carrots among the two oven bags, and place into a preheated 350 degree oven for approximately 90 minutes. Once you've removed the chickens from the oven, let stand for 10 minutes. I generally serve this with a fruit or green salad and rolls.

*If you're running low on time, you can always prepare the chickens the night before and let them sit in the fridge. If anything the flavors probably intensify this way.

I keep the juices from the chicken for my chicken noodle soup, which I generally make the following day. I don't really follow any recipe for my soup, but here's basically what I do:

Chicken Noodle Soup

Ingredients:

  • left over rotisserie chicken, shredded
  • left over juices from chicken (this is what makes it so good)
  • 4 large carrots, sliced, then halved
  • 1 small onion, cut into chunks
  • fresh parsley, chopped
  • approximately 6 cups water (I use stock if I have it on hand)
  • approximately 6 chicken bouillons
  • the following spices to taste: thyme, oregano, garlic salt, rotisserie chicken seasoning, salt and pepper
  • 1 bay leaf
  • a few handfuls of egg noodles (approximately 1 1/2 cups)

Instructions:
Throw everything but the noodles into the crock pot, set on low heat and forget about it. After 6-8 hours, add egg noodles and allow to heat an additional 15 minutes. Easy!!

signautre

Thursday, October 16, 2008

Recipe of the Week

Okay, so since I'm on sort of a freezer meals kick right now, I'm going to share another favorite of ours. So good and so easy, it's ridiculous! I have been waiting for pork roasts to go on sale for months now and finally found them for $1.88/lb. at Albertson's last week. Got this recipe from Amy nearly two years ago and have made it several times since. Sorry, no photos this time. I guess we ate it up too fast!

World's Best Pork Roast Rub
(for pulled pork sandwiches)

Rub ingredients:
  • 1 1/4 cups brown sugar, firmly packed
  • 2/3 cup granulated sugar
  • 3 tablespoons coarsely ground black pepper
  • 2 tablespoons kosher salt OR 1 tablespoon salt
  • 2 tablespoons ground ginger
  • 4 1/2 teaspoons garlic powder
  • 4 1/2 teaspoons onion salt
  • 1 tablespoon dry mustard
  • 1 1/2 teaspoons crushed red pepper
  • 1 1/2 teaspoons ground red pepper
  • 1 1/2 teaspoons ground cumin
  • 1 1/2 teaspoons paprika
  • 3/4 teaspoon dried thyme, crushed

Additional ingredients:

  • 1 pork roast (any size and cut)
  • your favorite bbq sauce
  • french rolls or any sandwhich bread of your choice
  • sliced cheese, if desired

Instructions:
Combine rub ingredients; mix well. Coat the roast with the rub, and throw it in the crock pot. Depending on size, cook anywhere from 4-6 hours on high or 8-10 hours on low. Remove roast, shred, transfer back to crock pot to soak up remaining juices, and add as much bbq sauce as you'd like. I generally leave it on "warm" for another 45 minutes or so before serving. Provolone, swiss or colby jack cheese make a great addition to these yummy sandwiches! I did a 4 1/2 pound roast earlier this week and froze half of it. The remaining portion, which we did not freeze, was gone within two days! So good!

Note:
This recipe makes about 3 1/2 cups of rub. Chances are you won't use it all at once. Store remaining rub mixture in airtight container at room temperature (or in freezer) up to 3 months.

signautre

Friday, October 10, 2008

Recipe of the Week

Another reason I love Fall? Comfort food that somehow tastes better when it's cold out. In addition to having that homey taste, this week's recipe holds sentimental value. It's my sweet grandmother's and she's been making it since I can remember. Several months ago I convinced her to share the recipe with me, and have now made it twice, including last weekend when Chloe and I had a tummy bug. Healthy, simple (other than lots of chopping) and delicious! Perfect for the fall season!

Grandma Martha's Leek Soup

Ingredients:

  • 3 cups leeks (about 2 large leeks), chopped
  • 2 cups celery (about 4 stalks), chopped
  • 5 carrots, sliced, then quartered
  • 3 large potatoes, chopped
  • 1 bunch parsley, stems clipped and finely chopped
  • 1 cube butter
  • 1 cup quick oats
  • 5 quarts water
  • up to 10 beef bouillons
  • salt and pepper, to taste
Instructions:

Melt butter in stock pot. Add quick oats and sauté until golden brown. Add leeks and sauté a minute longer, followed by celery, carrots and potatoes. Gradually add water, 1 quart at a time. Stir, and start adding beef bouillons, up to 10 (start with 6 and continue adding more and testing until the flavor is where you want it - I always end up using 10). Sprinkle in salt and pepper to taste. Simmer on medium low heat for 2+ hours. The longer it simmers the better. Also works great in a crock pot. About 30 minutes before serving, add parsley.


Tips from the chef:

  • If you have a food chopper, I'd highly recommend it.
  • Goes great with french bread and salad.
  • This makes a HUGE batch - you can half it or freeze part of it. I am planning to make another batch to freeze for when baby comes.
signautre

Wednesday, September 10, 2008

Recipe of the Week

Similar concept to traditional shepard's pie, but MUCH better! I found this in Fall's edition of Kraft 'Food & Family' magazine. You can also find the recipe here. It's received an average of 4.5 stars. It's simple and basic, but really yummy. Give it a try!

Tater-Topped Casserole

Ingredients:
1 lb. ground beef
1 small onion, finely chopped
1 (10 3/4 oz.) can condensed cream of mushroom soup
1/4 cup milk
1 cup frozen mixed vegetables
1 cup shredded cheddar cheese
1 lb. (1/2 of 32-oz. pkg.) frozen bite-size seasoned potato nuggets

Instructions:
Heat oven to 375. Brown meat with onions in skillet, stirring occasionally; drain. Spoon into 8-inch square baking dish.
Mix soup and milk; pour over meat mixture. Top with layers of mixed vegetables, cheese and potatoes.
Bake 45 min. or until potatoes are golden brown and casserole is heated through.

*My own two cents: I seasoned the hamburger meat with seasoned salt and a pinch of cayenne pepper. Definitely enhanced the flavor! Next time I think I'll sprinkle some cheese on top of the tater tots before throwing the casserole into the oven.
signautre

Sunday, August 10, 2008

Recipe of the Week

So I've had a 3 pound roast sitting in my freezer for who knows how long! Last week as I was evaluating our freezer inventory, I decided it was time to cook the darn thing once and for all, but my mind drew a blank as to what I could do with it. Sure, there was the traditional meat and potatoes, but somehow that never tastes as good to me during the summer months. Plus, with a roast this size, we would never finish the leftovers before they went bad. I wanted something different. Something new.

Well wouldn't ya know the very week I'm stewing over what to make of this chunk of meat, my friend, Melissa posts a recipe on her blog calling for a 3 pound roast! Not only did it look yummy, but it was a solution to my problem! Double bonus! I tried these babies out tonight and was very VERY satisfied. So was Neil. So were Dan and Stef, who joined us. And so, Melissa, I am not trying to steal your thunder, but simply passing along a very special treat for more to benefit from. Thanks again for sharing.

Melissa's recipe can be found here. I used hers as a guide, but added slightly different ingredients. Do what you will. Regardless, it will taste good. I promise!

Shredded Beef Taquitos

Ingredients:

  • 1 roast (I used a 3 lb. beef roast but I'm sure a pork roast would work great too)
  • corn tortillas (my roast made about 30 taquitos - so 30 tortillas)
  • canola oil
  • seasonings (I used seasoned salt, garlic powder, cumin, and cayenne pepper)
  • 1 7oz. can Herdez Salsa Verde
  • 1 10oz. can Rotel tomatoes & green chilies (undrained)
  • 1 green bell pepper, julienne sliced
  • 1/2 red onion, julienne sliced
  • olive oil
  • butter

Instructions:

  1. Heat some olive oil and butter (I did about 1 tbsp. of each) in a large skillet over medium heat. Once hot, place roast in skillet and brown on all sides. Transfer to crockpot. Add desired seasonings, Herdez Salsa Verde, Rotel tomatoes, bell pepper and onion. Cook on low for at least 8 hours or until roast easily falls apart.
  2. Remove roast from crockpot (keep the juices produced from the roast in the crockpot). Shred roast and return to crockpot. Mix well until juices have absorbed into the meat.
  3. In an electric skillet (or large skillet) heat canola oil (just enough to line the bottom of the skillet). Once oil is hot, fry corn tortillas only a few seconds on each side, then place on a paper towel-lined plate. This step simply prevents the tortillas from falling apart when you roll them into taquitos.
  4. Fill corn tortillas with desired amount of shredded beef and roll up. Line taquitos on an ungreased cookie sheet (seam side down) and bake at 400 degrees for about 7 minutes. Flip and bake an additional 7 minutes or until desired crispiness is reached.
We enjoyed these with spanish rice, beans, guacamole, sour cream and salsa. They would make great appetizers, but we easily made a meal out of them. It's like good Mexican restaurant grub cooked right in your kitchen! Give 'em a try!
signautre

Sunday, June 1, 2008

Random updates

Gosh, lots of updates to share! Here goes...

Just another reason I love Craigslist!

Check out this Craigslist find! 356 diapers (297 newborns and 59 size 1's) for $40! That averages just under $0.9 a diaper, which is especially awesome considering the majority are Pampers Swaddlers (my favorite, and one of the more expensive brands). Definitely a good start to the many of these we'll go through!

Family visits and house projects
Neil's sister, Lori came down from Greeley Friday afternoon and spent the weekend with us. We warned her beforehand that she might regret the visit since we'd likely put her right to work, but she didn't seem to mind one bit! And man, she was a tremendous help to us!

Saturday was pretty much spent outside. Lori and I made some progress on the trim (she painted along the roof while I worked on the lower areas of the house). And Neil spent the day shoveling out the remaining rock that was laying around the backyard, roto tilling and leveling everything out in preparation for sprinklers and sod.

Here's the yard, ready for action!


And let's not forget Daddy's little helper!

Ta da! Okay, so it doesn't look very pretty (yet), but it's a big improvement! I cannot tell you how excited I am to look out my window and see grass for a change! Just one more week!


Lori workin' hard on the trim


We're getting there...

Recipe(s) of the week
Food always seems to taste better when A) you're camping, or B) you've been outside workin' hard. That definitely proved to be true yesterday when we enjoyed some yummy grilled chicken that had been marinading all afternoon. It was so good, in fact, that I am going to share the recipe.

~Chicken Garlic Lime Marinade~
Ingredients:
1/4 c. olive oil
1/4 c. red wine vinegar
6 T. soy sauce
6 T. Worcestershire sauce
juice from 2 fresh limes
1 t. salt
1 1/2 t. black pepper
2 cloves garlic, crushed
6 boneless skinless chicken breasts

Instructions:
Combine ingredients in ziploc bag and marinade up to 6 hours, but no longer as the citrus will start to toughen the chicken. Rotate the bag often to ensure even coating. I quartered the limes, squeezed the juice into the bag and threw the rest of the limes in too (I figured it might help intensify the lime flavor). I grilled 2 large chicken breasts and 4 drumsticks and it tasted incredible! This chicken would also be great the next day over green salad and Creamy Cilantro dressing. In fact that just may be on my lunch menu for tomorrow!

And while we're on the subject of recipes, Camille and Nells both asked for the "chicken and noodles" recipe (based on the picture from my last post). I had to laugh because I wasn't expecting those requests, but simply stating my latest pregnancy craving (and how grateful I am that my husband isn't a picky eater). I don't really have a recipe, but here's basically what I do:

~Chicken and Noodles~
I saute about 1/4 c. chopped onion over medium heat for a few minutes. I then add 1-2 chicken breasts (chopped into chunks), along with some garlic salt, cayenne pepper and basil (all to taste). At that point I add a little more butter (if needed), then let everything saute, stirring frequently, until the chicken is browned and the onions look practically burned - it's partly what gives the dish such good flavor. I then add some heavy whipping cream. I never measure, but I'm guessing I add about 1/2 c. At that point I turn the heat to low, cover and simmer a few minutes longer. A lot of the cream is absorbed into the chicken (which just makes it more moist), but what does not absorb only thickens to make a great sauce! I sometimes add red bell peppers in addition to the onion, but only when I have them on hand. Then I just pour it over some cooked noodles (egg noodles or fusilli noodles are my top choices). I really have to give my mom credit for this because she made it up! She cooked it for us several months ago when she was out here, and I've made it several times since (most frequently within the last few weeks). Somehow her version still tastes better to me than my own, but I suppose it's that magic touch that only moms and grandmas have!

New Calling
I received a new church calling today! I've been on the Enrichment board for almost a year, and was released today and extended a new calling as Activity Days leader. I'll be working with the 8-11 year-old girls in the ward. Don't really know much about the program, but I believe it's in preparation for Young Women's and the responsibilities that come with that transition. It should be fun. I've worked very little in the Primary program, and while this isn't really a typical Primary calling, I think it will be a refreshing change!

Chloe's say
So like many expectant parents with a toddler, we've been asking Chloe the common questions: "Are you going to have a little sister or a little brother?" and "Is Mommy going to have a baby girl or a baby boy?" At first Chloe would go back and forth with her answers, or even change her mind two seconds after she'd told us. But for the past week she has consistently informed us that she is going to have a "little stister!" She is absolutely determined, and actually corrects us when we even suggest that it might be a brother. Kind of makes me wonder... What do you guys think? What has your experience been with this type of thing (for those of you who have more than one)? Are the kids usually right? I tell ya, I would sure be thrilled with another girl! Wouldn't have to buy her any clothes, seeing how she'll practically share a birthday with her big "stister". Time will tell, time will tell. We are pretty positive we have names picked out, but until we are positively positive, I think I'll wait to share. Hehe. :)

Happy June, everyone! Yay for summer!
signautre

Wednesday, May 7, 2008

Recipe of the Week

Enchiladas were sounding especially good to me today, but when Neil came home from work and told me he'd had enchiladas for lunch I decided our original meal plans for the evening would need to be altered. Taco casserole was the winning compromise! Different from enchiladas, but still zesty and cheesy, which I think is what mostly appealed to me with the enchiladas. I found this recipe on allrecipes.com months ago, and we've enjoyed it several times since. It's quick, easy and makes great left overs. Enjoy!

Taco Casserole

Ingredients:
1 pound ground beef
8 ounces macaroni
1/2 cup chopped onion
1 (10.75 ounce) can condensed tomato soup
1 (14.5 ounce) can diced tomatoes
1 (1.25 ounce) package taco seasoning mix
2 ounces shredded cheddar cheese
2 ounces shredded monterey jack cheese
3/4-1 cup crushed tortilla chips
Optional toppings:

Chopped green onions
Sliced black olives
Sour cream

Salsa

Instructions:
Preheat oven to 350.
Cook pasta in large pot of boiling water until almost done (it will continue to cook some in the oven). Drain.
In large skillet, cook and stir ground beef and chopped onion over medium heat until brown. Mix in tomato soup, diced tomatoes, and taco seasoning mix. Stir in pasta.
Spoon beef mixture into a 9x13 inch baking dish. Sprinkle crumbled tortilla chips and grated cheese over the top.
Bake 25-30 minutes. Serve with optional toppings or whatever else you'd like!

My own personal tips:
*I've found that the diced tomatoes often have larger chunks of tomato than I'd like so I throw them straight from the can into a food chopper for 10 seconds before throwing them into the pan. Just a personal preference.

*I never measure the cheese. I just sprinkle a handful of both over the top of the casserole.
*Next time I make this I'm going to add canned corn and possibly black beans!


Looks a lot prettier with the toppings, eh?
signautre

Saturday, February 16, 2008

Valentine's Day, Cafe Rio style...

This year for Valentine's Day I attempted a Cafe Rio feast for my husband, as we are both fanatics. He spent the week in San Diego on business, and after a very long day of meetings, flights and car rides, he made it home to my arms, safe and sound (at 9:12pm to be exact). I was thrilled to see him for the whole hour and a half of Valentine's day we spent together; and he was thrilled to be home, especially when he discovered the food that was waiting for him.

I found these on the internet, and every one claimed to be actual Cafe Rio recipes. I'm quite certain they aren't (except the salad dressing, which tasted about the same), nevertheless they have still become Andersen favorites (especially the pork) and I thought it'd be wrong of me not to share...

Sweet Pork
Ingredients:
3-5lb. pork loin or pork roast (bone-in roasts are cheaper and more tender)
1 1/2 cans Coca Cola
1 c. sugar
7oz. can chipotle chilies in adobo sauce
1 t. dry ground mustard (heaping)
1 t. ground cumin (heaping)
1 t. minced garlic
1/2 c. brown sugar (recipe didn't call for this - I included it for extra sweetness)
Instructions:
Place can of chilies in a bowl and cover with coke. Once the chilies are no longer coated with adobo sauce, remove them and throw away. If you prefer HOT, leave a few chilies in. I removed all but one chili and it was the perfect combination of sweet and spicy. Combine all ingredients (except pork) in a blender and mix. Place pork in crock pot and pour sauce over the top. Cook on high 4-6 hours or low 7-9 hours. Carefully turn roast over halfway through cooking. Remove pork and shred, then throw it back in and mix with juice. It may be liquidy, in which case you'll want to use a slaughtered spoon when serving.

Cilantro-Lime Rice
Ingredients:
1 c. long grain rice
2 c. water
2 chicken bouillons
1 t. butter
2 cloves garlic, minced
1 t. lime zest
2 T. freshly squeezed lime juice
2 t. sugar
3 T. fresh cilantro, chopped
Instructions:
In a saucepan combine rice, water, bouillons, butter, garlic, and lime zest. Bring to boil, cover and simmer 15-20 minutes, or until rice is tender and water is absorbed. Remove from heat. In a small bowl combine lime juice, sugar and cilantro. Pour over rice.

Black Beans
Ingredients:
1 can black beans, rinsed and drained
1 1/3 c. tomato juice
2 cloves garlic, minced
1 t. ground cumin
2 T. olive oil
1 1/2 t. salt
2 T. fresh cilantro, chopped
Instructions:
In a non-stick skillet cook garlic, cumin and olive oil over medium heat just until you can smell it. Add beans, tomator juice and salt. Continually stir until heated through. Just before serving, stir in cilantro.

Creamy Cilantro Dressing
Ingredients:
1 envelope buttermilk ranch dressing
1 c. mayonnaise
1 c. milk
1/2 bunch cilantro, chopped
2 tomatillos (look like green tomatoes surrounded by husks)
1/2 serrano pepper with seeds removed
Instructions:
Combine all ingredients in blender and mix until smooth. Refrigerate 1 hour to thicken.


And voilà! A romantically yummy dinner for two!


I found the tortillas at Costco - $5.99 for a package of 44! That's cheaper than the 12-packs you can buy at the grocery store (and at least a hundred times better - just another reason I love Costco)! Once you try these you'll never go back. They are uncooked, which means when you throw them in the pan for the entire minute and a half they take to warm up, they come out smelling and tasting like hot fresh restaurant-style tortillas!


This food was to die for! We've had it for dinner the last two nights and will probably eat it again tonight. Needless to say, Neil was pleased. Hope everyone else had a Happy Valentine's Day!
signautre

Tuesday, January 22, 2008

Recipe of the Week

Perhaps a more appropriate title for this post would be 'Recipe of the Month', or better yet, 'Recipe of the Century' since the last time I posted a 'Recipe of the Week' was October 27th! And even now I'm going to cheat against my own rules and post a recipe that I didn't even create! I found this on VeryBestBaking.com several months ago, and it's quickly becoming a family favorite. Chloe even loves it, which is a HUGE plus! Try it out for yourself and tell me what you think!

Zesty Chicken and Rice Casserole
Prep: 20 min.; Cooking: 1 hr.
Yields: 4 servings


Ingredients:
2 cups water
3 chicken bouillon cubes
3/4 cup long-grain white rice
2 T. butter
3 cups cooked, chopped (and seasoned to your liking) chicken breast meat (2 large breast halves should do it)
2 cups (8 oz.) shredded Monterey Jack cheese with jalapenos
1 can (12 oz.) evaporated milk
1/2 cup finely chopped red onion
2 large eggs, slightly beaten (don't let this ingredient prevent you from trying this - the egg is subtle, if even noticeable - all it does is solidify the casserole)
3 T. chopped fresh cilantro

Directions:
1) Preheat oven to 350. Lightly grease 2-quart casserole dish (I use an 11x13)
2) Bring water an bouillon to a boil in medium saucepan. Add rice and butter; cover. Reduce heat to low; cook for 15-20 minutes or until rice is almost tender and most of liquid is absorbed.
3) Combine prepared rice, chicken, cheese, evaporated milk, onion, eggs and cilantro in large mixing bowl; stir well. Transfer mixture to prepared casserole dish.
4) Bake for 40-45 minutes or until bubbly and edges are golden.

A few tips from the chef:
**A nice addition to this recipe is chopped ham. If I remember right, the very first time I made this I had leftover honey baked ham from Easter and it fit right in with the other ingredients!
**I always sprinkle some cayenne pepper over the top prior to baking.
**Fruit salad makes a great side dish!

This recipe has 391 reviews and an average rating of five stars. Always encouraging! Give it a try!
signautre

Saturday, October 27, 2007

Recipe of the Week

Okay, so this recipe I did create all by myself! Great comfort food, especially for this time of year.

Chicken and Harvest Rice Casserole (doesn't that sound Fallish?)

Serves: 6
Start to Finish: 45 minutes
Goes well with: Vegetables such as glazed carrots, green beans, or even a green salad. Crescent rolls make another great addition.

Ingredients:
2 boneless skinless chicken breasts
1 cup uncooked Garden Harvest Rice (see picture below)
2 chicken bouillons
1 T. butter
2 eggs
2 T. milk
3/4 cup bread crumbs
1/3 cup grated parmesan cheese
dash of cayenne pepper and seasoned or garlic salt, if desired
1 can Cream of Mushroom soup
1/3 cup milk
1 1/2 cups cheddar cheese
1/2 cup french fried onions
2 sheets of wax paper
Canola oil

Directions:
1) Bring 2 1/4 cups water and 2 chicken bouillons to boil in medium saucepan. Add 1 cup Garden Harvest Rice and 1 T. butter. Cover and turn heat to low. You will want the rice to cook approximately 20 minutes, but you can move on to step 2 once you've turned the heat to low (just keep track of time).
2) Place chicken breasts between 2 sheets of wax paper and pound with meat tenderizer until chicken breasts are about 1 cm. thick. Slice into 6 even pieces (to the best of your ability).
2) In a pie dish or shallow bowl combine eggs and 2 tbsp. milk. Whisk with fork. In another pie dish or shallow bowl combine bread crumbs, parmesan cheese, and seasonings (if desired). Mix until well-blended.
3) An electric skillet makes this next step much easier. If you have one, turn the temperature to 350 degrees (or medium heat). Otherwise a large frying pan will work just fine (turn to medium heat). Pour enough Canola oil into the skillet/pan to coat the bottom. It should take 4-5 minutes for oil to get hot enough.
4) Place individual chicken pieces into egg/mixture until well-coated. Then place into bread crumbs mixture until well-coated. Transfer to skillet. Cook on each side approximately 1 minute, or until slightly browned (it may not even take that long. And don't be concerned if the chicken doesn't seem cooked all the way through. It's gonna bake another 20 minutes in the oven).
5) By the time the chicken is finished, the rice should also be. Transfer the rice to a 9x13 inch casserole dish and spread evenly over bottom. Place chicken on top of rice in an even layer (it should pretty much cover up the rice).
6) In a bowl, combine Cream of Mushroom soup and 1/3 cup milk. Stir until well-blended. Then pour over chicken and rice. Sprinkle cheddar cheese over soup mixture, and sprinkle french fried onions over cheese.
7) Bake at 350, uncovered for 20 minutes.


* Walmart and Costco carry Garden Harvest Rice. If for some reason you can't find it, just use enough traditional long grain rice to make about 2 1/2 cups cooked.
* Also, if the rice is still a little watery after 20 minutes of cooking, transfer it over to the casserole dish anyway. Whatever liquid is left will absorb during those 20 minutes in the oven.
signautre

Thursday, October 18, 2007

Recipe of the Week

Cooking is one of my favorite things to do. It relaxes, fulfills and brings me great joy. I often experiment, which can sometimes be a scary thing and sometimes a wonderful thing. Regardless, I am lucky enough to have a tolerant husband who is willing to eat whatever's placed in front of him (thank you Mama Susie)! Last night I made this dish for the third or fourth time. My brother made an incredible pasta dish for me a while back, simliar to this, which I've kinda worked from to create this one. So I suppose I can't take complete credit, but enough that I'm going to call this my own. I've decided I'm going to start posting a "Recipe of the Week", and not just any recipe, but one that I've created myself. That's the goal anyway - until I run out of ideas! We'll see how long this lasts.

Chicken and Sausage Tortellini
Serves: 6
Start to Finish: 30 minutes (approx.)
Goes well with: salad and bread

Ingredients:
3 hot italian sausage links, sliced or ground (whichever you prefer)
2 chicken breasts (thinly sliced)
1 jar Classico Sun-dried Tomato Alfredo
1 cup milk or half & half
1 T. butter
1 quart-sized ziploc bag
1 16oz. package Cheese Tortellini
3 green onions, thinly sliced
½ red bell pepper, coarsely chopped
½ serrano pepper, coarsely chopped (only if you like spicy)
2 T. fresh parsley, coarsely chopped
2 T. fresh basil (or 1 t. dried basil)
1 t. garlic powder
½ t. cayenne pepper
Parmesan cheese and crushed red pepper

Directions:
1) Cook sausage over medium heat approximately 8-10 minutes until cooked through. Remove sausage from pan and set aside, but do not remove grease from pan.
2) Combine chicken, onion, peppers, parsley, basil, garlic powder, and cayenne pepper in ziploc bag and shake until chicken is well-coated. While pan is still hot, add butter to sausage grease. Once melted, add contents of ziploc bag to pan. Heat until chicken is cooked through, approximately 3-4 minutes.
3) In a bowl, combine Alfredo sauce and milk. Stir until consistency is smooth. I always pour the sauce in the bowl first, then add some of the milk to the empty jar, tighten the lid, then shake it and pour it into the bowl with the rest of the milk. That way you don’t waste any of the sauce.
4) Pour sauce into pan. Stir, cover, and turn to low heat.
5) Follow instructions according to the back of Tortellini package. Once cooked through, pour into pan of sauce, mix, and that’s it! Garnish (I love that word) with Parmesan cheese and crushed red pepper.

*Other variations of this dish, which I've tried and liked: shrimp instead of chicken, and angel hair pasta instead of tortellini.

The picture doesn’t quite resemble a Food Network gourmet dish, but it does taste quite good. Chloe devoured it. Try it out and let me know what you think!
signautre